


A jack stand is an essential tool for providing a safe work environment inside and underneath cars, trucks, or trailers.
Not only do jack stands protect technicians who need to work underneath vehicles, but they also provide stability for personnel while loading and unloading cargo trailers. See SafeRack’s line of jack stands
Jack stands generally consist of an adjustable A-shaped base frame, a ratcheting post with a platform for supporting vehicles, and a ratchet handle mechanism.
While you can use most jack stand models to lift a vehicle upward, the stand’s ratcheting mechanism must be disengaged in order to lower it. This is virtually impossible to do, as you would need to be able to lift the vehicle with your bare hands.
This solid mechanical stop provides exponentially more support than the hydraulics of your floor jack.
Why Should You Use a Jack Stand?
While hydraulic floor jacks can lift vehicles quickly and easily, they can (and likely will) occasionally fall — especially cheap models. This puts you and your vehicle at risk. Floor jacks also provide only one point of contact, which can leave your vehicle unstable and prone to tipping if you lift it from the middle.
Not only do jack stands protect you and your vehicle from falling floor jacks, but they also provide multiple points of contact that help you avoid tipping issues.
How strong are jack stands, exactly? Take a look.
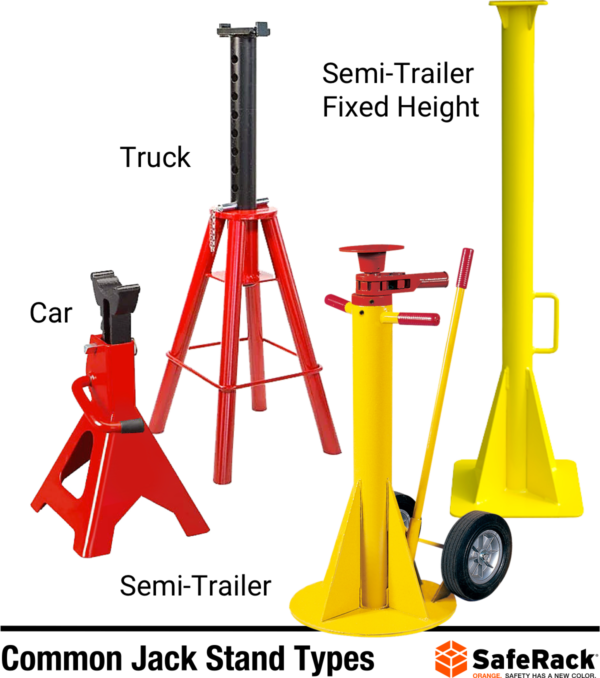
Jack Stand Types
While all jack stands perform the same general function, their structure and strength can vary based on the specific type of vehicle they are designed to support.
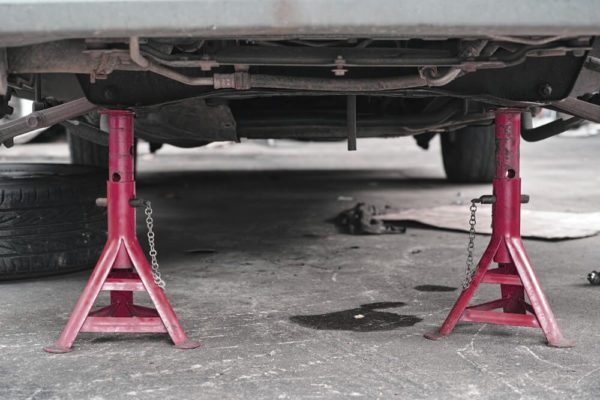
CAR JACK STANDS
Made from steel, cast iron, or aluminum, car jack stands are available in two styles: a three-legged pin lock model and a ratchet lock version with four legs. The ratchet-style is much easier to use and usually supports more weight, while the four-leg base provides more stability.
TRUCK JACK STANDS
Truck jack stands have heavier holding pins than car jack stands, as well as locking pins that serve as protection in case the locking mechanism fails. They also have wider bases, which protect bigger and heavier vehicles against tipping.
Most importantly, they are built to handle higher weight limits of 20 (or more) tons via their single-cast steel construction, which has a higher weight capacity than welded or aluminum models.
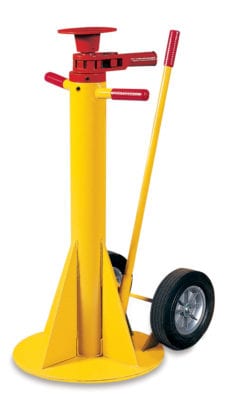
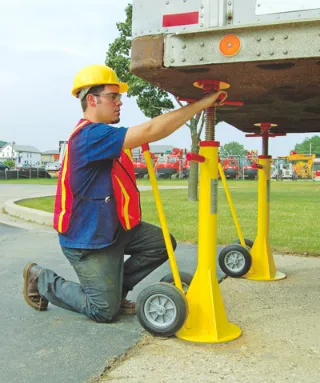
SEMI-TRAILER JACK STANDS
Resembling heavy-duty furniture dollies, semi-trailer jack stands are made of heavy gauge steel and feature extra large bases, solid rubber tires, and ergonomically friendly handlebars for easy handling and positioning.
Available with ratchet or gas-activated leveling systems and security locking safety pins, semi-trailer jack stands are designed with static load capacities of up to 100,000 pounds. Some models can also be used as trailer jacks with lifting capacities of 40,000 pounds.
SEMI-TRAILER STABILIZERS
Fixed height semi-trailer stabilizers are made with aluminum or steel, and add 75,000 pounds of proven load capacity to secure the trailer nose during loading and unloading. They require no maintenance, can be carried by hand, and are easy to slide in and out.
Technicians use the trailer landing leg handle to lower the nose until the trailer makes contact with the stabilizers, and then raise the nose back up again to remove the stabilizers when loading and unloading are complete.
OSHA Regulations Regarding Industrial Jack Stands
Occupational Safety and Health Administration (OSHA) standards dictate that trucks must be immobilized during loading and unloading in order to ensure the safety of workers. The standards include setting brakes and wheel blocks, as well as using jack stands.
OSHA also states that “a positive mechanical means” can be used to ensure that a truck is unable to move at the loading dock. These mechanical devices can include jack stands.
While OSHA does not mandate a specific type of jack stand — nor the number or placement of such stands — when stabilizing semi-trailers, the agency says “[f]ixed jacks may be necessary to support a semi-trailer and prevent upending during loading or unloading when the trailer is not coupled to a tractor.”
The agency also has additional safety standards specific to jacks:
- All jacks — including lever, ratchet, screw, and hydraulic varieties — must include stop indicators, and the stop limit must not be exceeded.
- The manufacturer’s load limit must be permanently and prominently marked on the jack, and the load limit must not be exceeded.
- A jack should never be used to support lifted loads. Once a load has been lifted, it must be blocked up immediately. (Place a block under the jack’s base when the foundation is not firm, and place a block between the jack cap and load if there’s a chance the cap might slip.)
- To set up a jack, rest the jack on a firm, level surface; center the jack correctly, make sure the jack head bears against a level surface and that lift force is applied evenly.
- Jacks must be maintained and lubricated regularly.
- These tools should be used continuously or intermittently at one site must be inspected at least once every 6 months.
- Tools sent out of the shop for special work must be inspected both when sent out and when returned.
- Jacks that handle abnormal loads or shock must be inspected before use and immediately thereafter.
When using portable jacks to support semi-trailers, OSHA strongly recommends following both the trailer and the jack manufacturer’s instructions regarding their proper number and placement.
Due to the potential for bumpy and rough road conditions, trailer manufacturers instruct operators and technicians to properly load, block, and brace cargo to prevent load shifts and tipping per the North American Standard for Protection Against Shifting and Falling Cargo. Following these guidelines is crucial for establishing safe loading and unloading conditions involving jacks and jack stands.
In addition to reiterating OSHA regulations, jack manufacturers like Aldon Company, Inc. offer additional recommendations for safe usage of jack stands:
- Jack stands are designed solely for the support of semi-trailers. Do not use them for any other purpose.
- For proper support, use two (2) jacks per trailer. A single jack will not prevent side-tipping.
- Do not install jacks on transverse floor beams of the trailer behind the kingpin.
- The load capacity of the jack must be equal to the gross weight of the trailer.
- If the driveway slopes, the load capacity is reduced due to side-load on the jack. Take this into account when using jacks.
- Position jacks near the front corners of the trailer. Make snug contact with the smooth steel underbody on each side of the kingpin.
- The trailer must be securely blocked (with wheel chocks or dock-lock) when stabilizing jacks are used.
- Place Jacks on firm flat ground.
- The top plate of the jack must be in snug contact with the underside of the trailer.
Safety Risks… And How to Avoid Them
Thankfully, the number of people who are injured or killed by falling vehicles each year is very low. When something tragic does happen, it typically involves a vehicle that fell off a jack, slipped off the blocks, or fell when a jack failed. Very rarely does it involve a jack stand.
The main risk factor that technicians need to remember is that jacks are designed to lift vehicles, while jack stands are designed to support their weight.
There is a seal at the end of the cylinder on a jack that is essentially the only component that maintains the hydraulic pressure needed to keep the vehicle in the air. This seal is not intended to carry such a load for long periods of time, and forcing it to do so can increase the chances of an accident.
When a jack is used properly and a jack stand supports the weight, however, the likelihood of an accident is greatly reduced.
Why You Should NEVER Buy Jack Stands on Amazon
Just like with any manufactured item, there can be significant differences in build quality from one model of jack stand to another. These differences can be even more pronounced when trying to save a few bucks by shopping for jack stands on Amazon.
Not only can cheaper models lack the quality of more expensive ones, but the precision, reliability, and overall quality can even vary within the same batch of manufactured tools.
Consider the following Amazon reviews for just one pair of economy jack stands:
“Unlike (the) experience of others here, the welding itself was acceptable on the pair I received. What was not acceptable was that one of the two stands was crooked because the top of the base (the part containing the ratchet mechanism) was welded on at an angle…
Amazon sent a replacement pair of stands out to me (they actually upgraded me to the T43002A model with a locking bar). but one of that pair was also crooked due to the same welding problem. This is a real safety issue which makes these stands unacceptable (even if the quality of welds themselves is acceptable)…
Great Amazon service as usual but Amazon needs to take a close look at the quality of these stands especially due to safety issues.”
– “The hinges were rusted when they arrived and the pin holding the stopper in place was rusted out in one of the jack stands. This prevented the jack stand from staying in place. I am glad that I tested them out before putting them under my car because this is very dangerous!”
– “The welds had cracks and I don’t want to risk anything.”
These reviews serve as a reminder that buying a great tool that will last forever is safer and more cost-effective in the long run than buying cheaper versions of the same tool over and over again.
16 Steps for the Safe and Proper Use of Jack Stands
Step 1 – Inspect your equipment. Check all parts to ensure that they are in proper operating condition. Inspect legs for bends, breaks, or metal deformation. If any tool is faulty, repair or replace it.
Step 2 – Wear proper clothing, including a hard hat or welding helmet, safety shoes, and welding gloves while lifting a vehicle.
Step 3 – Keep the floor in your work area clear of clutter to allow for unobstructed movement around the jack.
Step 4 – Operate from a proper position, keeping your balance and proper footing at all times.
Step 5 – Keep alert and keep bystanders at a safe distance. Never allow anyone under jack stand with a load.
Step 6 – Park your vehicle on a firm, solid, and level surface such as concrete or asphalt. Never raise your vehicle on soft or uneven ground. If the ground shifts or the jack changes position, you could be seriously injured or killed
Step 7 – To keep the vehicle from rolling back unexpectedly, chock the wheel(s) opposite from where you will put the jack. If you will be jacking up the front right wheel, put the chock behind the rear left wheel. If you are jacking up the left side of the vehicle, put one chock ahead of the front right wheel and one more behind the rear right wheel.
Step 8 – Inspect your floor jack and make sure the pressure relief valve is closed. (You typically close the valve by twisting the jack lever clockwise.) Don’t use your vehicle’s emergency jack for routine repairs, only for emergencies. If your jack is leaking fluid or shows other signs of disrepair, stop working and repair or replace your jack before you proceed.
Step 9 – Locate a secure jack point in the part of the vehicle that you want to lift.

A secure jack point is either: an area designed specifically to make contact with a jack, or an area that can safely support the full weight of the vehicle without slipping off the jack. (Refer to your owner’s manual for the locations of your vehicle’s jack points. There is typically one near each wheel. There may also be one between the front wheels and another between the rear wheels. If you’re not sure, ask for outside help.)
The jack should make contact with a sturdy, unpainted section of the vehicle’s frame. Don’t put the jack under a body panel. Not only can this damage the vehicle, it can also injure or kill you.
Step 10 – Slide the jack under your vehicle at the chosen jack point. To raise one of the front wheels, position the jack just behind it. To raise one of the rear wheels, position the jack just in front of it. You can also raise both front (or rear) wheels simultaneously by using a jack point midway between the front (or rear) wheels. Some vehicles have a dedicated jack point for this. With other vehicles, you’ll need to position the jack beneath the front or rear subframe.
Be sure to place the jack under the subframe exactly midway between the front (or rear) wheels. Do not place the jack under the oil pan, radiator, steering rack, or other non-structural components.
When raising both rear wheels, you may be able to use the rear differential as a jack point. This is not always the case, however, and can damage some vehicles — so refer to your vehicle’s documentation.
Step 11 – Looking under the vehicle, adjust the jack’s position so it will make secure contact with the jack point when raised. The angle of the vehicle will change as it is raised, so be sure to position your jack so that it won’t slip off the jack point.
Step 12 – Begin raising the vehicle by pumping the jack handle down and back up repeatedly. Keep an eye on the jack where it makes contact with the vehicle to make sure it stays seated properly as you raise it. If you can’t do that, pause after raising the vehicle an inch or two and verify that the jack made solid contact with the jack point.
If you need to, lower the jack back down by slightly opening the release valve. Then close the release valve, and reposition the jack so that it makes better contact.
Continue raising your vehicle until it is high enough to allow you to put your jack stand(s) in place.
Step 13 – Slide your jack stand(s) into place near the jack, beneath a secure area of the vehicle’s frame.
If you are raising both front or both rear wheels, place your jack stands to either side of the jack, near the wheels.
The purpose of the jack is to raise the vehicle, but the jack stand holds the vehicle in place. Be sure to place it in a safe spot that you know can support the weight of the vehicle, without it slipping off the jack stand.
Step 14 – Slowly open the jack’s release valve, lowering the vehicle until it comes to rest on the jack stand. Once the full weight of the vehicle is supported on the jack stand(s), you can either remove the jack or leave it in position for later.
If you don’t need to use the jack elsewhere, it’s a good idea to leave it in place as added insurance.
Note: Always give your vehicle a slight shake before climbing underneath to make sure your setup is secure.
Step 15 – After you’ve serviced your vehicle, use the jack to raise it back up an inch or so, and remove the jack stand(s).
Step 16 – Slowly open the jack’s release valve to safely lower the vehicle back to the ground. Once the vehicle has been lowered, remove the jack.
From fall protection at the loading terminal to crossovers inside a distribution center, SafeRack has the systems you need to keep your operation productive, efficient, and safe. Learn how our innovative technology patented designs and extensive expertise help employers across the globe improve worker safety and productivity.